header 3

How to fix a bike puncture

A bike puncture is certainly not a cyclists idea of a good time. Fortunately, for an experienced cyclist, a bike puncture repair is a relatively simple task that can be performed quickly and with minimal disruption to your ride. Want to know how? Just follow our experts' advice.

If you have any doubts, don’t hesitate to contact a certified professional

Is your tyre bike puncture repairable?

This is the first point to be clarified since a bike puncture repair is not always possible.

Generally speaking, if your tyre has suffered a small puncture such as that caused by a nail or something of a similarly small size, then you should be able to fix it with a bike puncture repair kit. But if your tyre or inner tube has a large gash, it’s probably time for a replacement.

If it’s the case, remember Michelin has a wide range of quality tyres to suit all kinds of bike.  

How to find a puncture in a bike tyre

Before you can even think about bike puncture repair, you need to know what you’re dealing with. It’s easy enough to see that you have a puncture once your tyre has gone soft—or completely flat—but you need to know where that puncture is before you can do anything about it.

  • Start with a simple visual inspection of your tyres. If your bike puncture was caused by something significant—like a nail or shard of glass—it will be easy to spot. However, do avoid running your hand around the wheel to feel for a sharp object. Remember, if it’s sharp enough to puncture your rubber tyres, it’s also sharp enough to puncture your skin!
  • If you can’t see any obvious cause of the puncture, it’s time to take the wheel off. If your tyre is tubeless, leave it on the wheel; otherwise, you’re going to have to remove the tyre to get the inner tube out.
  • Next, you’ll need some soap, like the kind you use to do the dishes. Make sure the tyre is inflated (if the puncture is so big you can’t inflate the tyre, it should be easy to spot) and coat the tyre walls with the soap. You’re looking for bubbles in the soap, which indicate where air is escaping.
  • If this doesn’t work, you’re going to need a large waterproof container. If you are checking an inner tube, the container doesn’t need to be very large as the inner tube can be squashed up a bit. If you’re checking a tubeless tyre, the container will need to be at least large enough to get a portion of the wheel rim inside. Finally, fill your container with water—just enough to be able to get a portion of your tyre or inner tube underneath the surface, and then begin working it around so that every part of it spends a little time under water. Again, you’re looking for bubbles caused by air escaping through the puncture. Be sure to get the valve under the water too, just in case that is the cause of your deflating tyre.
Bike tyre puncture is always a painful moment for cyclists

How to fix a bike puncture

Once you have located your puncture, it’s time to fix it. The bike puncture repair process will vary according to the type of tyre: a tubeless bike puncture repair is not the same as repairing a tyre with an inner tube.

Fortunately, you’re going to have to take the tyre off the wheel in either case. So if you’re not sure which type of tyre you have, just get the tyre off, and you’ll soon be able to tell whether there is an inner tube inside or not!

Step 1: Remove the wheel

Bike puncture repair requires the wheel to be removed

Before you can carry out any repairs, you need to take off the wheel. This process should be broadly the same on most bikes, though you may need to consult the bike manufacturer’s instructions in some cases. Generally, you will need to loosen the brakes so the wheel can slide free. The exact process will differ depending on the type of brakes you have.

If the bike puncture is in the front wheel, you should be able to remove it by simply loosening the central nuts holding the wheel in the frame and sliding it out. Some bikes even have quick-release levers, meaning you can do this without tools. If you need to know how to repair a rear bike tyre puncture, things are a little more complicated, because this wheel is driven by the chain.

If your bike has gears, adjust them so the chain is on the smallest cog on both the crankset (the cogs near the middle of the bike) and the rear cassette (the cogs at the back wheel). This will make the chain looser and easier to remove once you get the wheel off. Next, undo the central nuts and slide the wheel out.

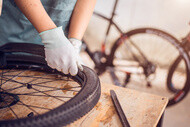
Step 2: Remove the tyre

Before you can remove the tyre, you will need to deflate it—assuming it is not already flat from the puncture. To do this, remove the dust cap from the valve and press down on the small pin in the centre to release the remaining air.

  • First of all, unclip the beads from the rim
  • Push them down in the well of the rim.
  • Pull out the 2nd bead by hand
     

If you are using Tubeless Ready, make sure you collect the sealant.
Tip: remove your TLR tyre in a place where it doesn’t matter if it gets dirty.
(When removing a Tubeless Ready tyre, drops of sealant can splash onto nearby surface).

Next, take a pair of tyre levers and work them under the rim of the tyre. If your tyre uses an inner tube (or you’re not sure), be careful not to lever too hard, otherwise you may nick or tear the inner tube. Once you have part of the tyre wall over the rim, start working your way around. When all of one side of the tyre is over the rim, you should be able to lever part of the other sidewall over, and then simply pull it with your hands. Be careful not to trap your fingers. When the first tyre bead is passed over the rim hook, do the same with the second one.

Step 3: Make the repair

  • How to repair tubeless bike tyre punctures: The specific instructions of your chosen bike puncture repair kit should be written on the kit, but always make sure the area you plan to repair is clean and dry before applying the repair. With a tubeless tyre, often you are going to be applying the repair to the inside of the tyre facing outwards. Make sure you allow the amount of time your bike puncture repair kit recommends before refitting the tyre. Keep in mind that some damages cannot be repaired and could affect your safety, if in doubt for tubeless tyres MICHELIN advises you to contact a certified professional.
     
  • How to repair inner tube punctures: Essentially, the instructions for how to fix a bike puncture on a tubeless tyre mostly apply here, too. You will need to put some air into your inner tube to give it a little shape and stop it from pinching. Remember also that the repair will take place on the outside of the tube, with the repair patch facing inwards. The rest of the process is basically the same. Again, make sure the area you are repairing is clean, and allow the recommended time before putting your tyre back on.


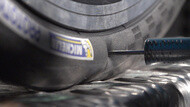
Bike puncture repair kit

For our MICHELIN repair kit, you must follow this process:

  1. Once you have located the puncture
  2. Clean the puncture area thoroughly with an emery cloth. CAUTION: Be careful not to damage the airtight skin on the inside of the tyre or the reinforcing cords (for tubeless).
  3. Ensure the cleaned area is larger than the patch to ensure good adhesion.
  4. Peel off the protective film from the patch ensuring that the part of the patch which will be in contact with the inner tube (or the tyre for tubeless) is not contaminated. Slightly inflate the tube before applying the patch.
  5. Apply the patch by pressing hard on the entire surface area; especially the edges. Allow the patch to dry for 2 to 3 minutes.
  6. The puncture is now repaired.
     

Step 4: Testing

Before putting everything back together, give your tyre another water test as described in the above section for finding a puncture. Bike puncture repair may only be a minor inconvenience to an experienced cyclist, but for the sake of an additional few minutes, dipping your repaired tyre in some water is worth doing before putting your wheel back on.

Step 5: Reinflate your tyre

Now, it’s time to inflate your tyre. Make sure to inflate it to correct pressure for your tyres. It’s also worth raising the wheel off the ground and giving it a spin to make sure everything is now in good working order.

Step 6: Put it all back together!

Once you’re satisfied that your repair is good, you can start putting your bike back together. This process is essentially a direct reversal of what you did to get the tyres and wheels off in the first place.

You are using an unsupported web browser
You are using a website browser that is not supported by this website. This means that some functionality may not work as intended. This may result in strange behaviours when browsing round. Use or upgrade/install one of the following browsers to take full advantage of this website