What equipment do you need to fit a tubular tyre?
A tubular tyre cannot be fitted to just any bicycle wheel. If you are planning to fit a tubular tyre for the first time, make sure your wheel is compatible.
Bear in mind that it can be glued with tape or glue. We therefore recommend that you have the following equipment, depending on the gluing option you choose:
Specific glue or adhesive for tubular tyres
Make sure you use a gluing product that has been designed for tubular tyres (i.e. not just any glue, if you opt for glue), as it must be able to withstand the rise in temperature associated with braking. Many tubular wheels are still fitted with pad brakes, which heat up the area next to the tubular where the glue has been applied. Ordinary glue is unlikely to withstand this friction.A brush to apply the glue to the tubular and rim
If you opt for glue (we'll also look at how to use adhesive below), you'll need a brush to spread it.A pair of gloves
As the glue can be messy, we also recommend that you wear gloves if you opt for this type of gluing.
Removing the tubular
If the wheel has already had a tubular tyre, the glue will have to be removed, which can take some time and involve certain difficulties. We'll take you through the steps, but if you don't feel comfortable with this operation, don't hesitate to take your wheel to a professional for fitting.
1 - To be done 24 hours before assembly
The diameter of the tubulars is small compared to the diameter of the wheel so that they securely stay on the rim once mounted. To stretch it up a little, we recommend that you pre-inflate the tubular 24 hours before fitting the tubular tyre so that it starts to stretch, giving it more elasticity when you lay it down.
2 - Remove the tubular
Always start removing your tubular from the opposite side to the valve.
Start by peeling off the edges of the tubular as much as possible by hand.
Repeat this operation on both sides to remove the entire tubular from the rim. Using a flat-head screwdriver can make the operation easier but is not recommended, since there is a high risk you will damage the rim and tubular.
When you have succeeded in peeling off part of the tubular from the rim, you simply need to pull on it to remove the rest entirely.
3 - Remove glue residues
The next step is to remove the glue residues from the rim. If you don't do this, it could create an imperfection that could cause the wheel to jump when it turns, due to the extra thickness.
The professionals use a screwdriver to remove the first layer, taking great care not to damage the wheel. This is not recommended for beginners as it could scratch the carbon of the wheel and damage it.
You can finish off by using adhesive paper to remove any remaining glue. The idea is to obtain an even surface all around the rim.
4 - Stretch the tubular
Before mounting a tubular, you must stretch it. Inflate the tubular to the max recommended pressure, close the valve and let it sit overnight.
Fitting the tubular
Make sure the valve is long enough in relation to the rim. If necessary, add a valve extender.

Fitting tubular tyres with glue
The following steps apply to you if you have chosen to glue the tubular.
Inflate your tubular to about 1.5 bars to make it easier to apply the glue.
On the lower part of the tubular, there's a strip that comes into contact with the wheel, a protective cotton sheet. This is the part we're going to glue.
1 - Apply glue to the tubular
Working on a clean work surface in a well-ventilated area, apply a thin line of glue to the underside of the tubular. Spread the glue evenly using a brush.
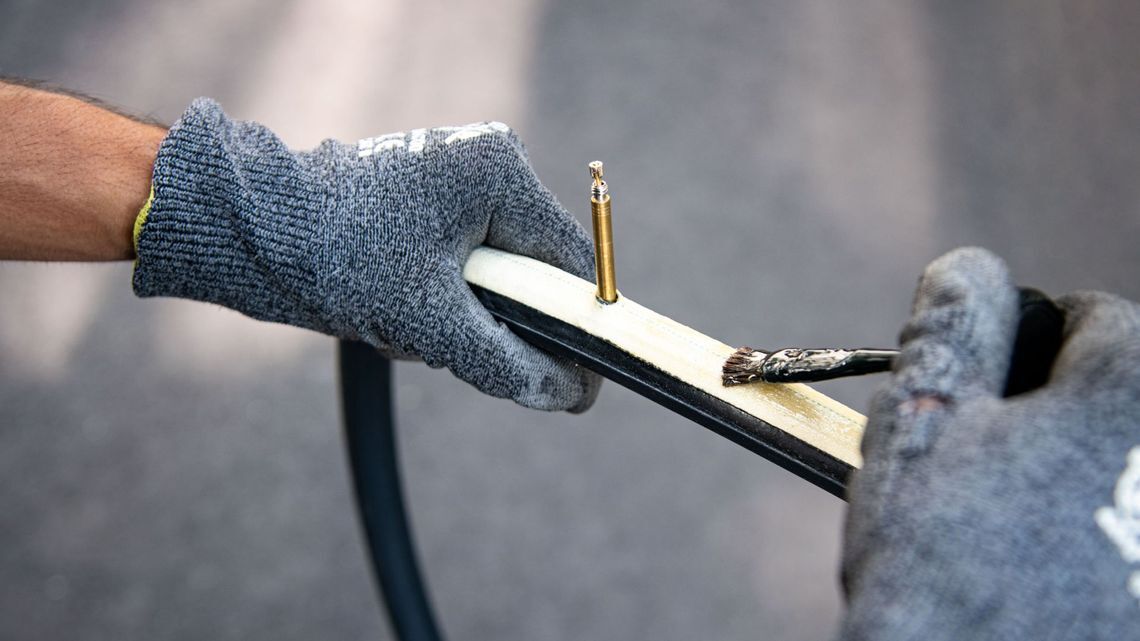
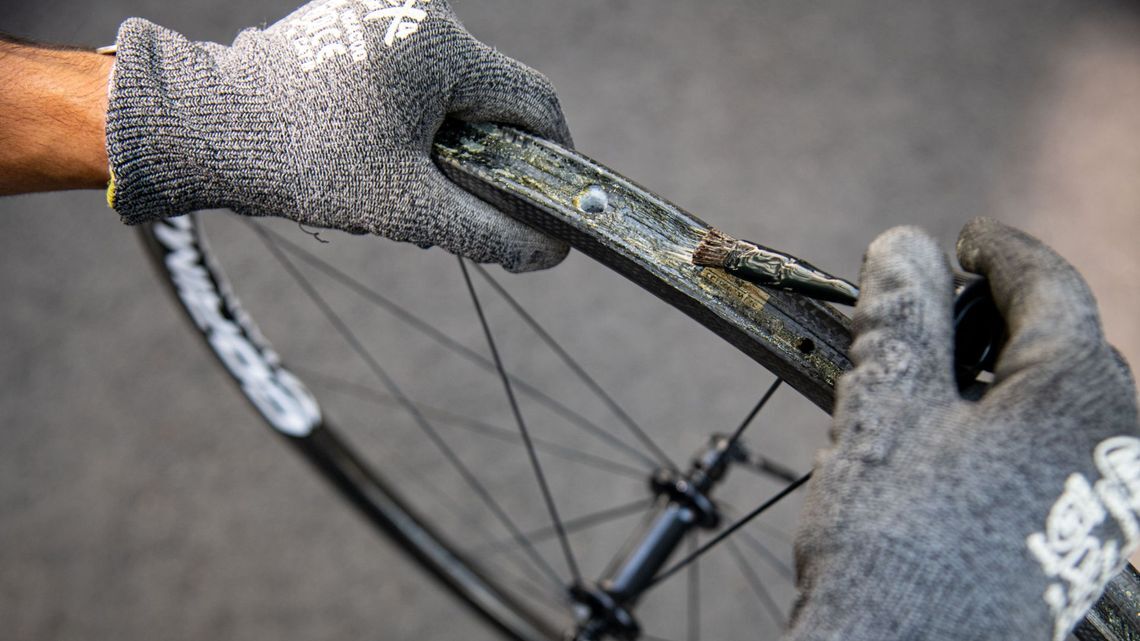
2 - Apply glue to the rim
Perform the same operation on the rim. Make sure the surface is even all around the rim.
Once the glue has been applied, it is important not to position the tubular on the rim straight away. Let the glue dry for about 20 minutes. When the glue is no longer stringy when you touch it with your finger, you can stick the tubular onto the rim.
3 - Position the tubular
First, insert the valve and, little by little, stick the tubular to the rim.
Start with the valve, as this is where the tubular is centred.
Then position the tubular around the wheel, moving up on either side of the valve and finishing on the opposite side. Make sure it is centred on the wheel. As the protective sheet protrudes a little on each side of the tubular, you can see whether it is positioned correctly or not and adjust it if necessary.

Important: let it rest for 1 or 2 hours before rolling, to allow the glue to bond between the tubular and the wheel.
Fitting tubular tyres with tape
We recommend you only use tape on new rims, or rims on which you have previously used similar tape. Make sure the rim is perfectly clean, use a degreaser if necessary. Depending on the depth of the rim, use a valve extender if you need to.
1 - Apply the tape
The tape sticks to both sides and is covered by a removable film above and below. The latter should only be removed once the tube has been positioned.
Start 15 cm from the valve hole.

Slowly peel off the bottom film of the tape. At the same time, press the tape onto the rim. Place the tape around the entire circumference of the rim. Where the two ends meet, cut off any excess tape to avoid overlapping the two ends.
Make a hole where the valve is positioned, without removing the tape from the rim.

2 - Fit the tubular
Carefully peel off the first few centimeters of the top film of the tape and place the tubular on your rim. Make sure the top film of the tape remains accessible when the tubular is mounted on the rim.
Inflate the tubular, center it on the rim, then deflate it to about 1.5 bars.
3 - Pull of the top film
Once the tubular has been fitted, go around the wheel and gently pull off the top film of the tape.

4 - Inflate the desired pressure
Your tubular is now stuck onto the rim. Inflate to the desired pressure, according to your size and weight. Do not exceed the maximum pressure indicated on the side of the tubular.
Wait another 24 hours before using.
Can I put sealant in my Michelin tubulars?
It is perfectly OK to add tyre sealant to the inside of your tubulars to prevent punctures.
Make sure that the valve shell is removable, otherwise you risk clogging everything with fluid. Michelin tubulars are all fitted with a valve with a removable shell.

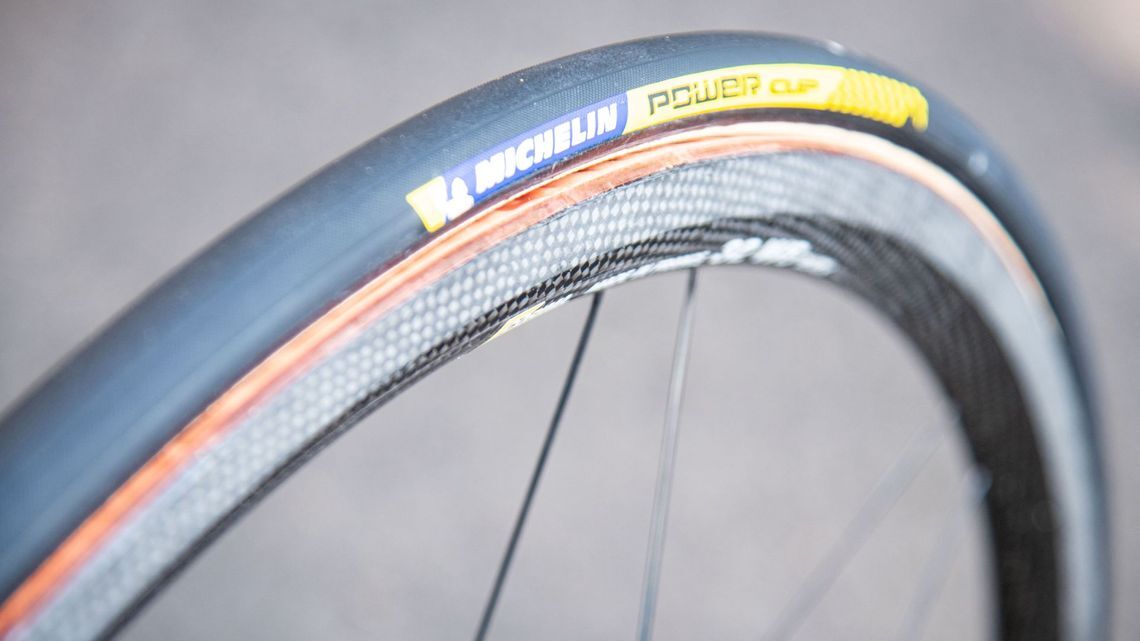
Michelin POWER CUP TUBULAR RACING LINE
Achieve your goals with the MICHELIN Power Cup tubular
Michelin POWER CYCLOCROSS MUD TUBULAR RACING LINE
Designed to finish on the podium
Michelin POWER CYCLOCROSS JET TUBULAR RACING LINE
Designed to finish on the podium


